

How To Repair A Chipping Bath Tub
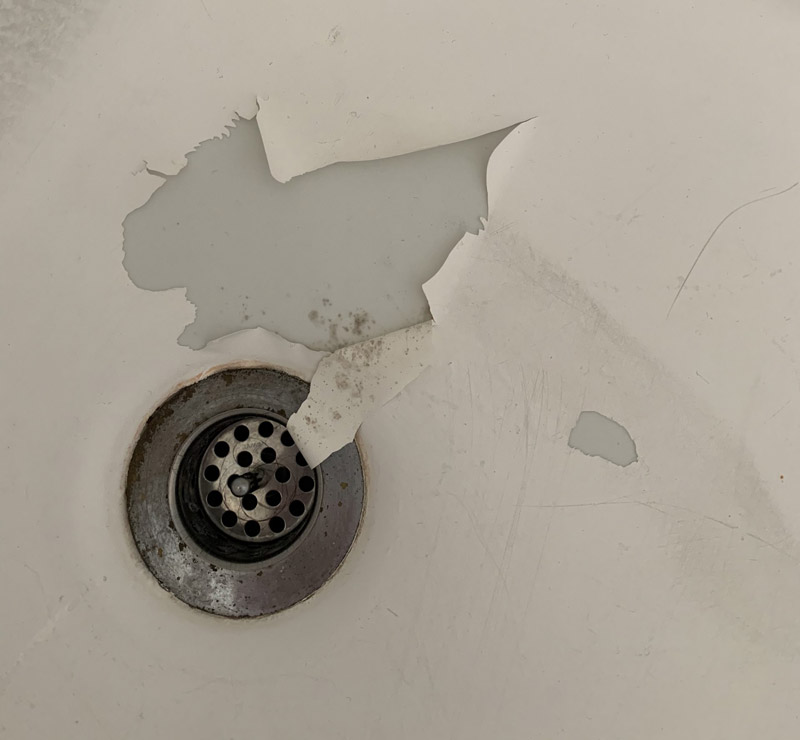
Peeling of bathtub paint is a condition that will rundown your bathtub. So, it would help if you took proper care of it. If the bathtub is looking a fiddling rundown, you can give it a new glaze of pigment before thinking of replacing information technology.
Fixing a peeled bathtub is a practice-information technology-yourself project that will save you some money you could take used to rent a professional person to do the job. Whether the tub has a few minor fries or scratches, or it is badly damaged and requires to be refinished, it is a project that you will detect tools and exercise it yourself.
eight Steps to fix peeling bathtub paint:
Peeling of bathtub pigment is a common matter amid many homeowners. It is a condition that may run down your tub if it is not carefully looked at.
Step 1: Gather the materials required
The starting time thing to do to fix a peeling bathtub is to get together all the materials you may need to perform the project. Make sure yous buy a two-component epoxy kit for the scrap repair together with the accompanying tools. It can be found in the adhesive repair section of the home hardware store. Get the kit with both the hardener and catalyst that you volition mix to cream the epoxy.
The majority of epoxy scrap repair kits are fabricated in white shades to match the nearly common color of the bathtubs. Ensure that you select the kit that will match the shade of the bathtub. You tin also choose ii kits that you lot can mix to get the right colour. Epoxy repair kits primarily work in all kinds of bathtubs.
Step 2: Make clean the damaged area
The second step is to scrub and clean the damaged area for effective painting. Get a sponge and a tub cleaner or soap and scrub the damaged area. Take warm h2o and a dish detergent to clean the chipped surface area. For constructive cleaning, you lot tin besides use acetone to make clean the area.
The use of acetone volition help in softening the caulk, making information technology easier to remove. After scrubbing and cleaning the entire area, make sure y'all thoroughly dry the chipped area with a make clean rage. It is also essential to article of clothing rubber gloves equally you lot work to protect your hands.

Footstep 3: Discard the old caulk and remove the spout and bleed to get painted.
Discard the sometime caulk to the garbage bag and then that it does not get in the way. Ensure you have a garbage bag almost yous as you scrub off the caulk so that you can put information technology in easily. Y'all can throw it away since you won't be using information technology anywhere. If you lot practise not become all the caulk off, do non worry because y'all volition be sanding down the tub afterwards.
The next stage requires you to remove the spout and drain then that they do non get painted. Utilize the screwdriver to remove the water spout and drain fixtures. Use this time to make clean these fixtures earlier you return them.
Stride 4: bleaching the bathtub
Follow the directions provided on the epoxy kit to mix the two components to bleach the bathtub. Some epoxy kits feature a stirring stick and mixing tray to be used in mixing the components. Mix the epoxy in the disposable tray with the toothpick or the stirring stick.
Using a modest spatula or paintbrush, apply the epoxy to the chip area. Scoop up a little amount of epoxy and spread it carefully in the thin layer over the chip surface area. Make sure you spread it by working in one direction and smooth out all the spots where it pools. It is appropriate to utilize dispensable items when applying the epoxy.
Follow the directions on the epoxy kit to allow it fully dry. After ensuring that it has stale, gently sand the surface using sandpaper until it gets smooth like other tub parts. If you experience the chip, you can repeat the process by adding another layer of epoxy to remove them birthday.
Step 5: Refinishing badly damaged tubs
Get the bathtub refinishing kit from a nearby home comeback middle. Ensure the kit contains sandpaper, refinishing pigment, tub cleaner, brush, roller, pigment tray, and primer. As well, ostend if the kit has a durable resin coating for the tub. Ventilate the bath and cover the floors. Put up a fan and open all the windows. Information technology is appropriate to put on your protective gear.
Use the cleaner that is provided in the kit and clean the bathtub. Follow the directions provided on how to apply the cleaner and so use the sponge to scrub it. Rinse the tub so become over information technology using the sponge and cleaner again to remove any stain or scum earlier refinishing information technology.
Sand the tub with sandpaper to remove the old finish. Sand the whole surface in a circular move using an electrical sander or past hand. Do it until you feel it is shine.
Pace 6: Repair any cracks or chips
Later on sanding the whole tub, you lot can cheque to see if any crack or chips are remaining. If you lot find one, repair it using a 2-component epoxy crack repair kit. Mix the two parts of the epoxy in a tray. Take a spatula or a small brush to apply a thin layer of the epoxy to any crack or chips in the tub.
Wait for two to three hours until the epoxy dries up before sanding the patches down using 2000-grit sandpaper. This will aid to friction match the end of the parts of the tub.
Step 7: Applying the paint
Before you start applying the paint, record the protective sheets on the floor and walls, use the masking tape to secure the plastic sheeting to the floors and walls surrounding the tub. You can also lay the plastic sheeting over other fixtures like the sink and toilet. It is recommended to apply acrylic paint.
Clothing old wearing apparel and put on the respirator one time you are ready to paint. Ensure that y'all wear things that you will not listen getting dirty. The respirator will exist used for safety purposes. Paint fumes are really h3, so it is crucial to protect yourself. Follow the provided instructions on how to prepare the paint and prepare it properly.
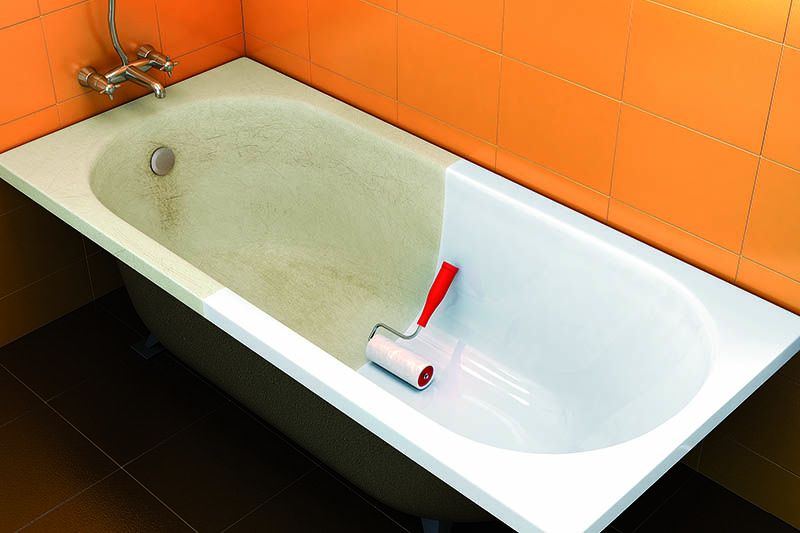
Load the spray gun past following the provided spray gun's instructions to know how much the paint to load. Call back to continue the lid on the pigment to prevent the enamel from drying up. You lot can also utilize rollers and paint brushes if yous don't want to use the spray gun.
Offset from the top and piece of work your fashion systematically across the length of the tub with even motions. Make sure you proceed the spray gun about viii inches away from the tub. Repeat the process until information technology is well painted, and then motion on to the exterior part of the tub.
After finishing the exterior of the tub, allow the get-go coat of the pigment to dry before applying the 2d glaze. You tin can allow it to dry out for 15 to twenty minutes. The moment information technology is dry, apply the second coat without missing any areas.
Stride 8: Finishing the tub
Permit the tub to stay alone until it is cured completely. Do non run whatsoever water or pace in it. Follow the instructions provided by the manufacturer for curing fourth dimension. Remove the tape and reattach the removed tub fixtures. With the help of the gun, reapply the caulk to those areas where the tub meets the shower. Your bathtub will be fixed completely.
Air bathtubs are more than durable than the traditional bathtubs. By installing a luxury air bathtub you lot tin solve the pilling problem in the long run.

Conclusion
If you have meant to practice something about the peeling paint on the bathtub, grab the tool kit and become started. We have greatly looked into some of the steps yous can follow to ready peeling bathtub pigment. Lay down the tools, follow the procedures, and your tub volition look new over again.
The peeling surfaces of the tub can be repaired by filling the cracks or holes, cleaning the surface, and priming it. The moment the surface is dry, you can then repaint it following the manufacturer's instructions. With this do it yourself steps, you can save money and requite your tub a new glaze rather than replacing it.

How To Repair A Chipping Bath Tub,
Source: https://www.designswan.com/archives/how-to-fix-peeling-bathtub-paint.html
Posted by: alvaradoatimenswo.blogspot.com
0 Response to "How To Repair A Chipping Bath Tub"
Post a Comment